
The decision
Planning permission for external wall insulation has now been granted, which means we can move from comparing the two approaches to developing the EWI details for construction.
Our original design used internal wall insulation on the remaining external walls of the existing house. As the project developed and we looked more closely at how the two approaches would work in practice, we became increasingly convinced that insulating externally would be a better solution for our house.
We have therefore chosen EWI wherever it is physically possible, with IWI retained where the party boundary prevents us from insulating externally. The decision was not simply about achieving a particular U-value. We also considered thermal bridging, moisture, thermal mass, internal floor area, the condition of the existing brickwork, appearance, cost and the practicalities of achieving a continuous layer of insulation around an existing house.
Why the cavity is not enough
The external walls of our 1930s house are approximately 280 mm thick, consisting of a 100 mm outer brick leaf, an 80 mm cavity and a 100 mm inner brick leaf.
The existing cavity wall assembly
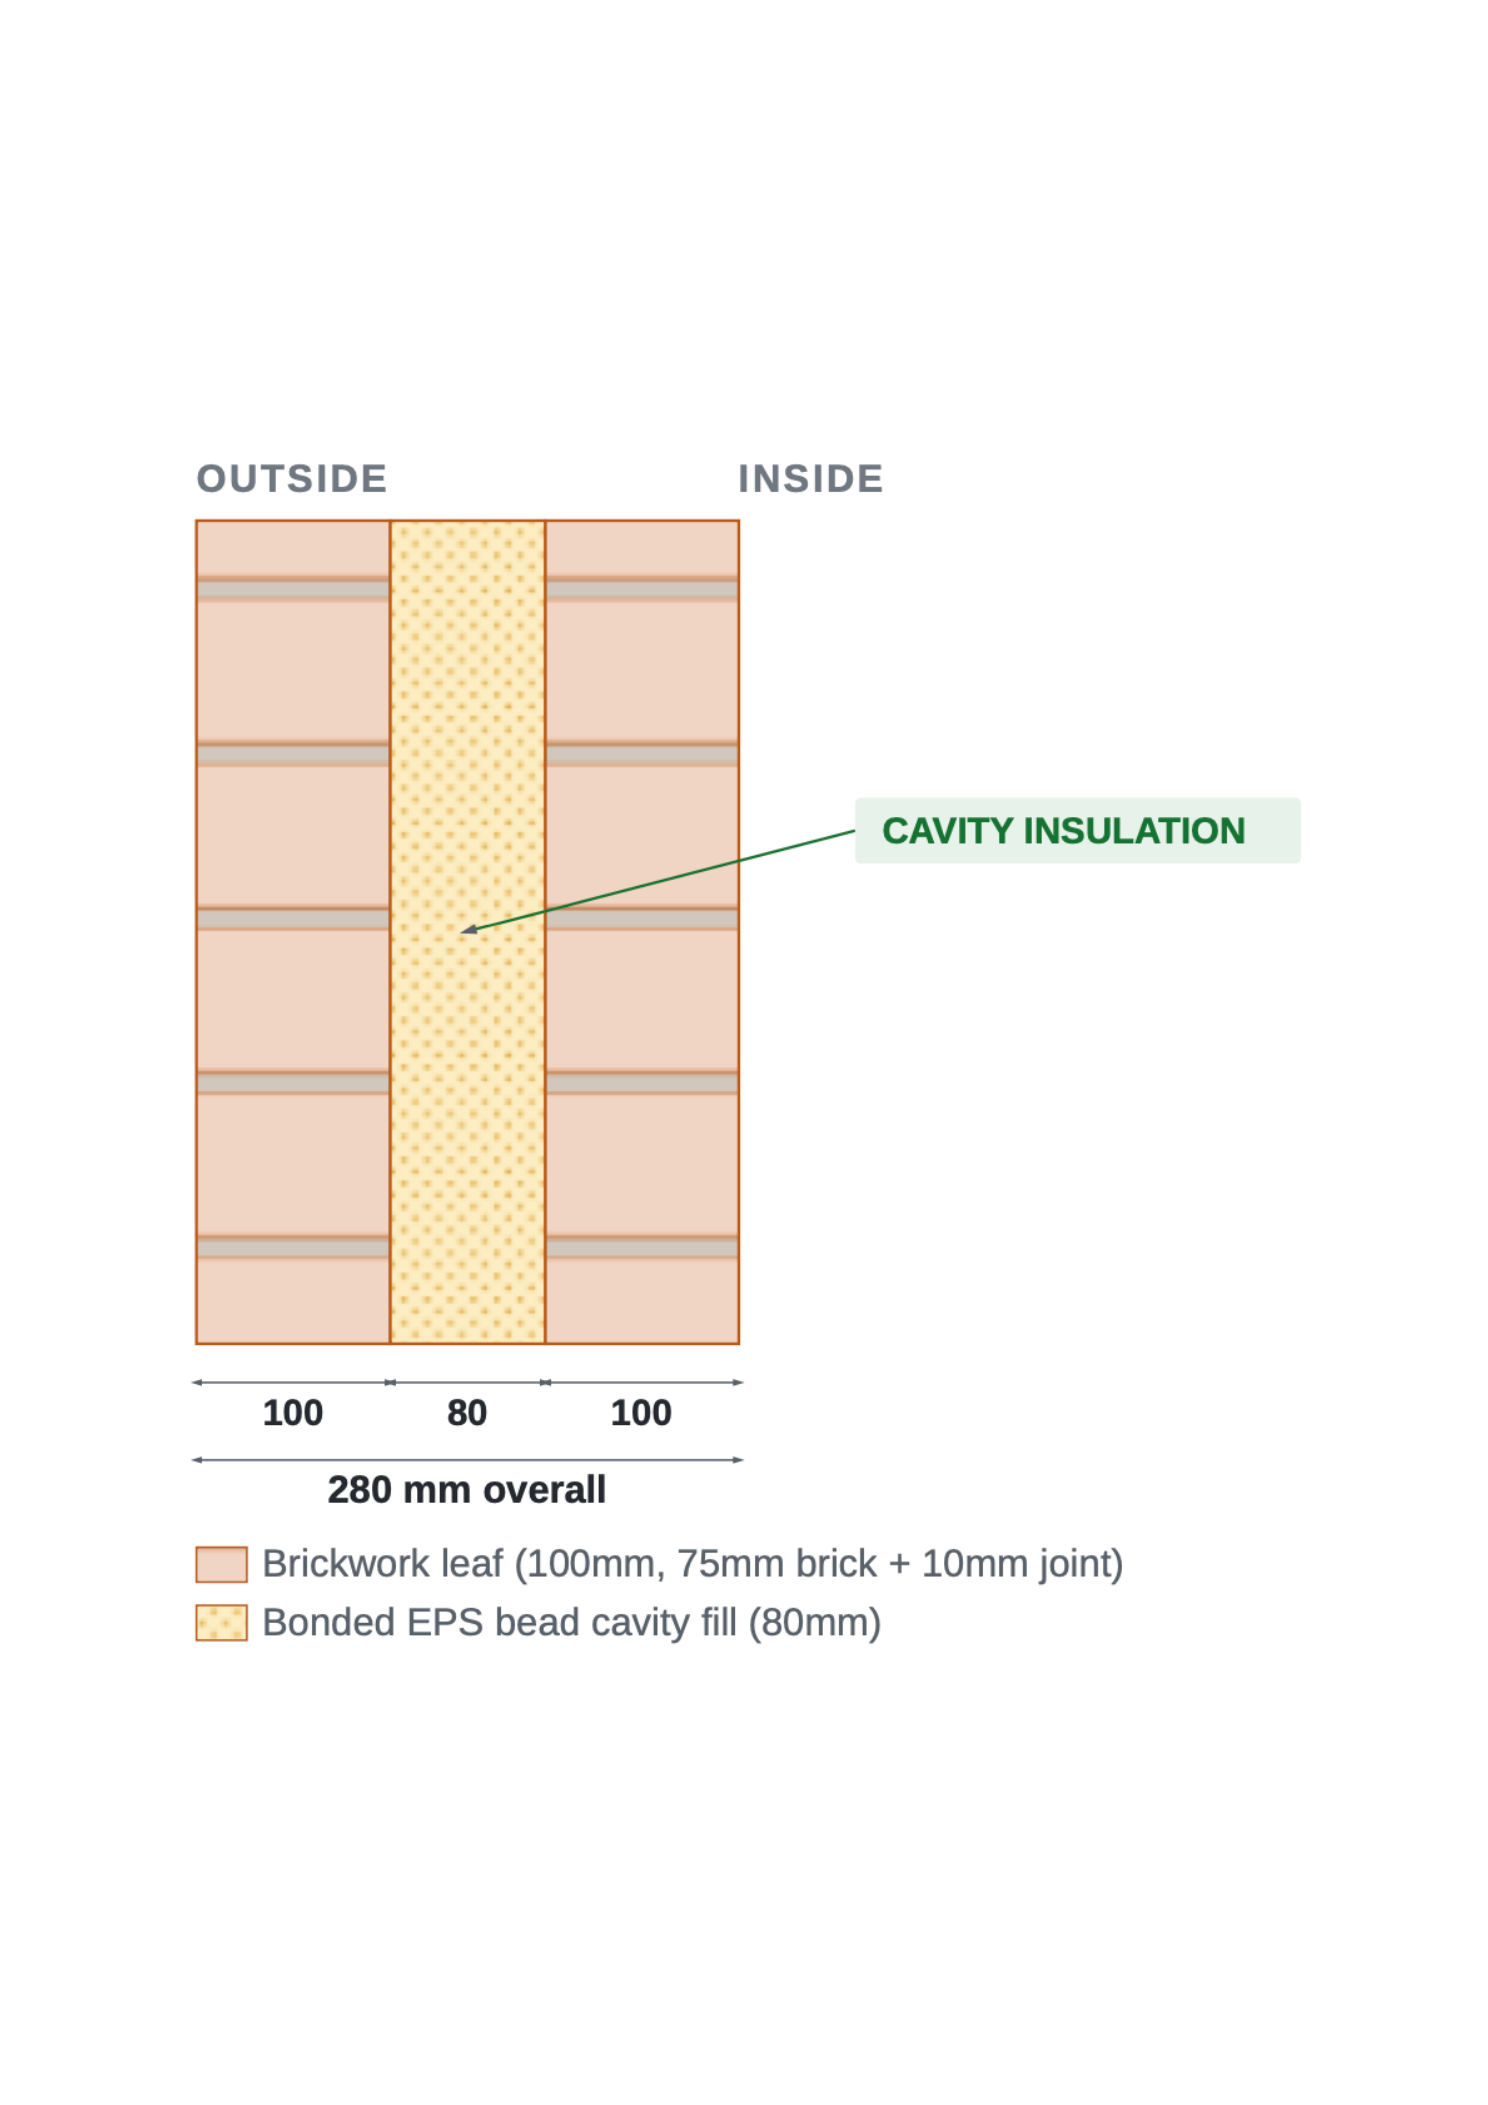
The basic construction is not dramatically different from a modern cavity wall, but there is much less space available for insulation. Our walls are also already standing, which limits access to the cavity and means that insulation has to be installed retrospectively.
We can still improve the cavity by drilling small holes through the mortar joints and injecting insulation into the void. We have chosen bonded EPS beads because we felt they offered the best balance for our existing walls between improved thermal performance and moisture management.
Filling the cavity is worthwhile, but an 80 mm cavity cannot accommodate enough insulation to achieve the level of wall performance we are aiming for. We therefore needed an additional layer of insulation, either inside or outside the existing walls.
The original plan: internal wall insulation
Our architects initially specified internal wall insulation. The proposal was to fill the existing cavity and add approximately 50 mm of insulation internally, finished with plasterboard, to the external walls that would remain exposed after the wraparound extension had been built.
There were good reasons for this approach. IWI would significantly improve the thermal performance of the walls while preserving the existing external brickwork, avoiding an increase in the external dimensions of the house and generally costing less than a complete external insulation system. For quite a while, that was the plan.
Why we changed our minds
The idea of EWI came from a conversation with a friend who works in construction. They mentioned that they were planning to use external wall insulation on their own renovation, which prompted us to look more closely at whether it might also make sense for ours.
As we learned more about the differences between the two approaches, EWI became increasingly appealing. No single advantage changed our minds; it was the combination of several.
A more continuous layer
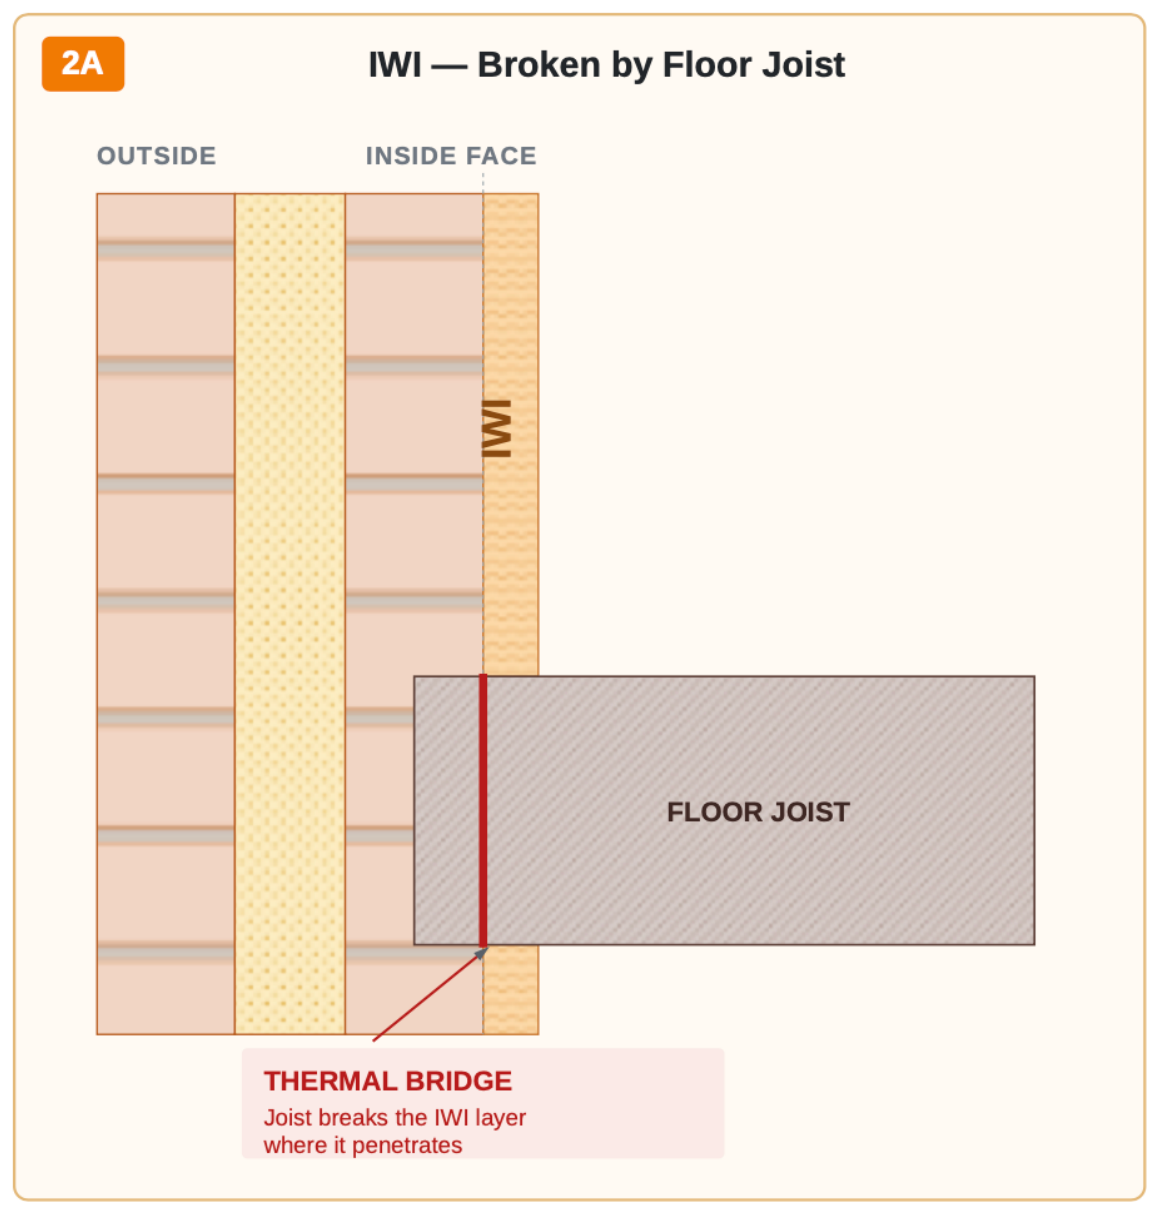
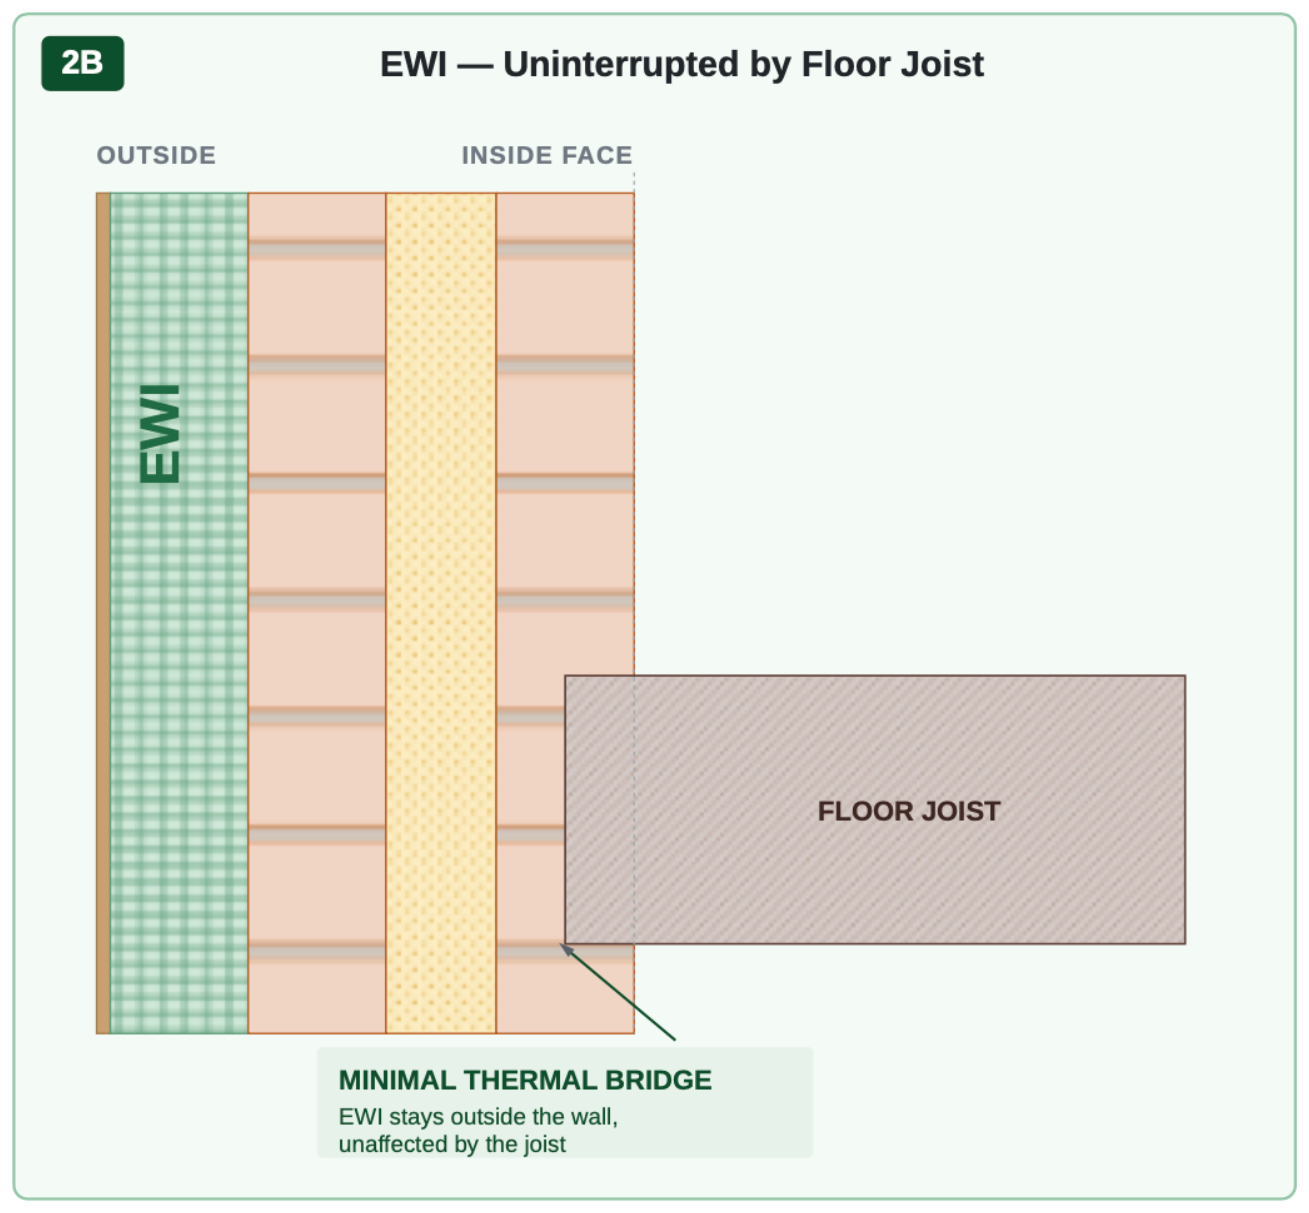
EWI can continue past intermediate floors and around much more of the structure without interruption, reducing thermal bridging where continuity can be maintained.
Internal floor area
The additional thickness sits outside the house, so the existing dimensions of affected rooms remain unchanged.
Thermal mass
The existing masonry remains within the insulated envelope, allowing it to help moderate changes in indoor temperature through the year.
Moisture management
EWI keeps more of the existing masonry on the warmer side of the insulation. Our chosen system is also vapour-open, although careful moisture design remains essential.
Existing brickwork
The new external finish covers cosmetic defects and reduces the value of repointing purely for appearance, although necessary repairs and wall-tie replacement still remain.
Whole-envelope detailing
Walls, openings, eaves and other junctions can be considered as parts of one external thermal envelope rather than as separate room-by-room interventions.
IWI and EWI compared
| Issue | IWI | EWI |
|---|---|---|
| Insulation continuity | More difficult at floors, partitions and some junctions | Greater opportunity for a continuous layer around the structure |
| Thermal bridging | More difficult to address at some internal junctions | Reduced where external insulation can continue uninterrupted |
| Existing masonry | Mostly outside the insulated envelope | Within the insulated envelope |
| Thermal mass | Less of the existing masonry contributes to internal temperature stability | Existing masonry can help moderate changes in indoor temperature |
| Moisture | Existing masonry becomes colder and requires careful moisture design | Existing masonry remains warmer, although moisture design is still important |
| Internal floor area | Reduced | Unchanged |
| Installation | Work takes place internally | Most work takes place externally |
| Existing brickwork | Remains visible and may require repointing | Covered, although necessary structural repairs remain |
| External appearance | Existing appearance retained | Appearance and wall thickness change |
| Planning | Less likely to be required if the exterior is unchanged | May be required because the external appearance changes |
| Cost | Generally lower | Generally higher |
The drawbacks of EWI
EWI was not better in every respect, and there were several reasons for us to hesitate. The most obvious is cost: a complete external system is generally more expensive than insulating internally, particularly once the external finish and junction details are included.
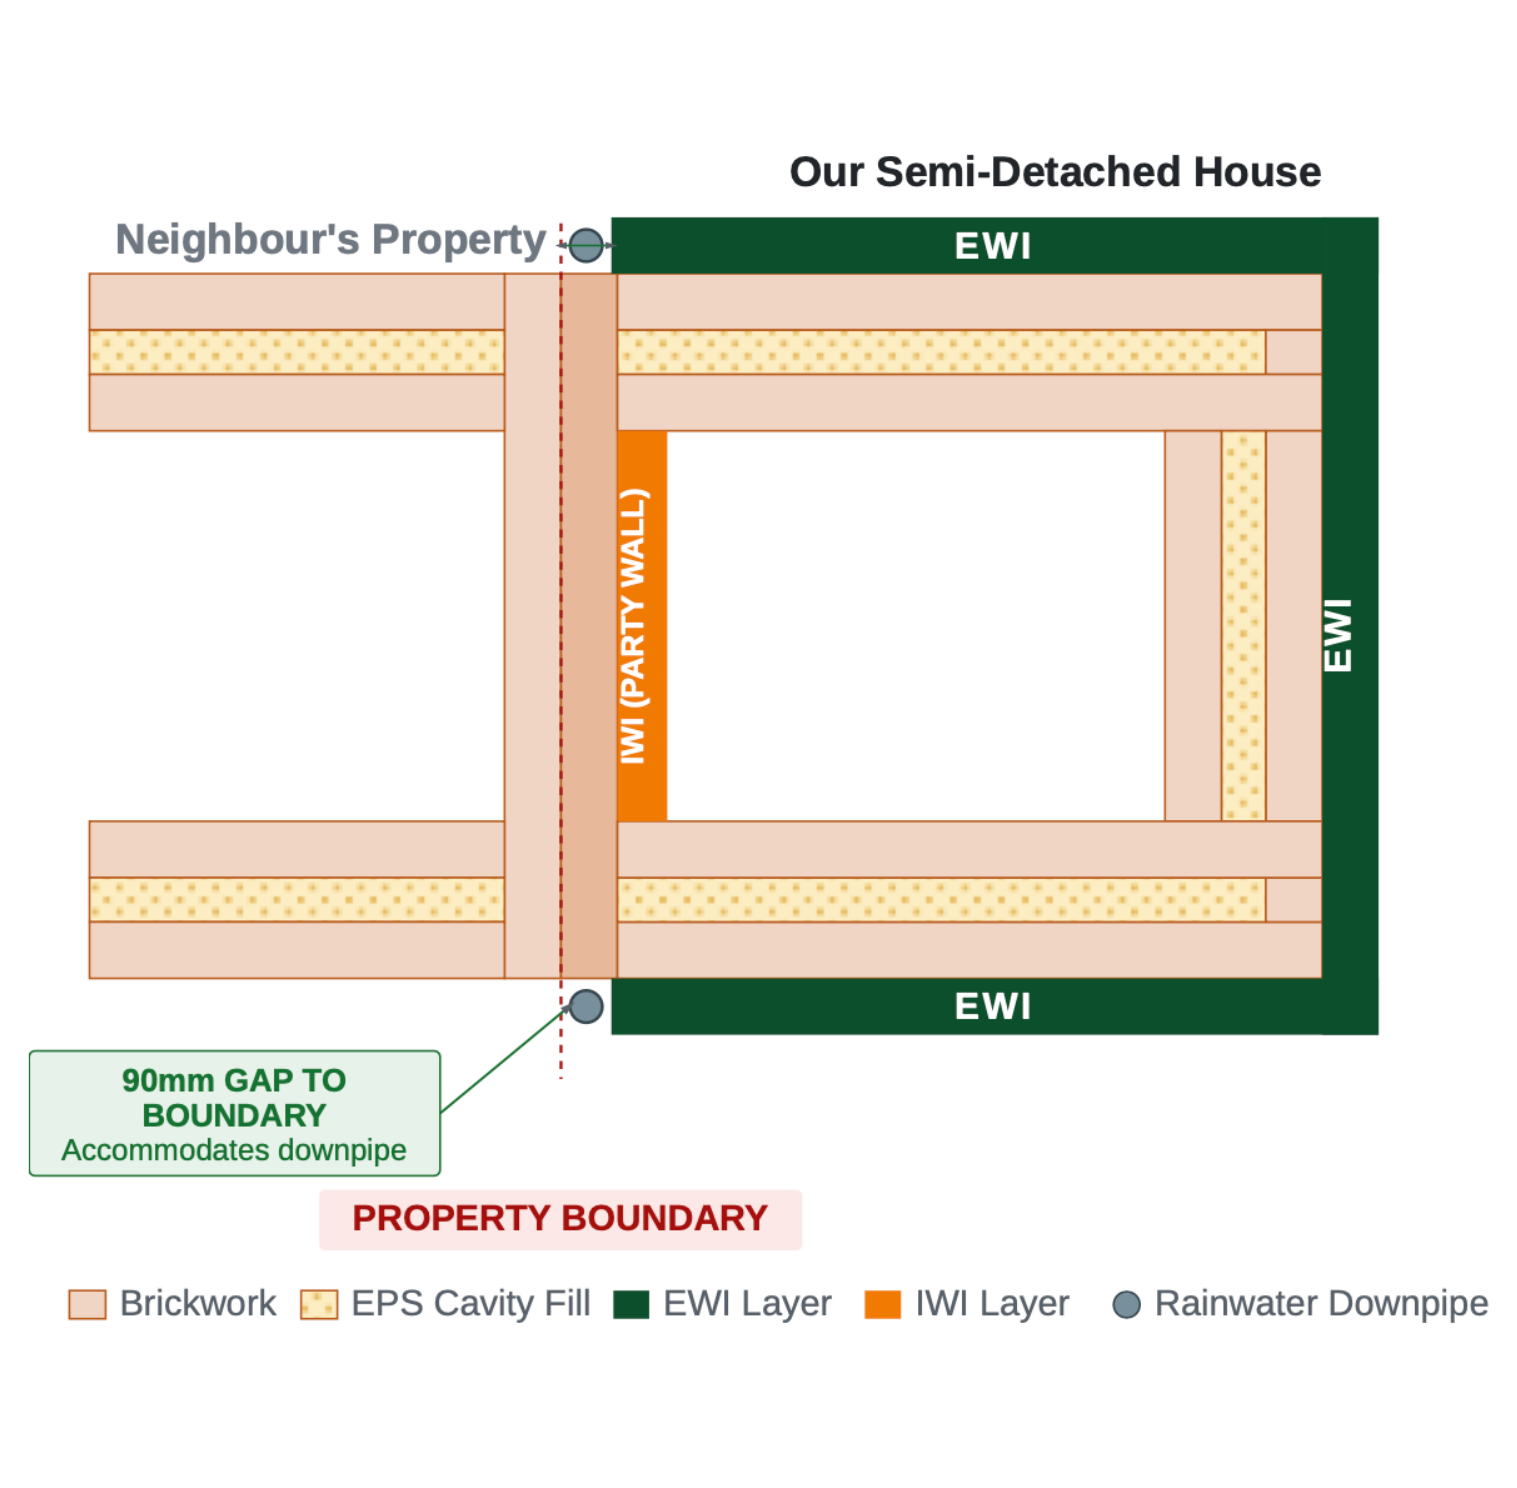
It also changes the dimensions and appearance of the building. This is particularly relevant because ours is a semi-detached house, so adding insulation to our half creates a visible step where our thicker wall meets our neighbour's house at the boundary.
The quality of the detailing is equally important. Windows, doors, sills, eaves, roof connections, rainwater goods, services and the base of the wall all have to be considered carefully. Poor detailing in these areas could undermine many of the reasons for choosing EWI in the first place.
Choosing the right system and installer is therefore crucial. We plan to appoint the EWI specialist separately from the main contractor, which means the two will need to coordinate closely wherever their work meets.
Getting EWI through planning
After considerable deliberation, we decided that the advantages justified changing the design and applying for planning permission. One of the planners' concerns was the appearance of the step that EWI would create where our house meets our neighbour's at the boundary.
Our solution was relatively simple: position a rainwater downpipe directly in front of the junction so that it visually disguises much of the change in wall thickness. We also chose brick slips rather than render, partly because the planners wanted the altered elevations to remain sympathetic to the existing brickwork and partly because we wanted to retain the character of a traditional brick-built 1930s semi.
Boundary plan view — where EWI and IWI sit
What planning permission unlocks
Receiving approval means our Building Regulations drawings can now be changed from the original IWI strategy to EWI, with detailed junctions developed around windows, doors, eaves and the other places where continuity matters. Potential main contractors can also price the project knowing that EWI forms part of the final strategy.
Because the EWI will be installed by a specialist subcontractor appointed separately by us, we can now plan how their work will interface with the main build. That coordination matters because many of the critical details occur exactly where the work of one trade meets another.
Why one wall will still use IWI
There is one part of the house where EWI is not practical. The party wall sits directly on the boundary with our neighbour, which means we cannot extend external insulation beyond our property. We will therefore retain IWI on this wall while using EWI on the external walls where it is physically possible.
Temperature through the wall — existing, with IWI, with EWI
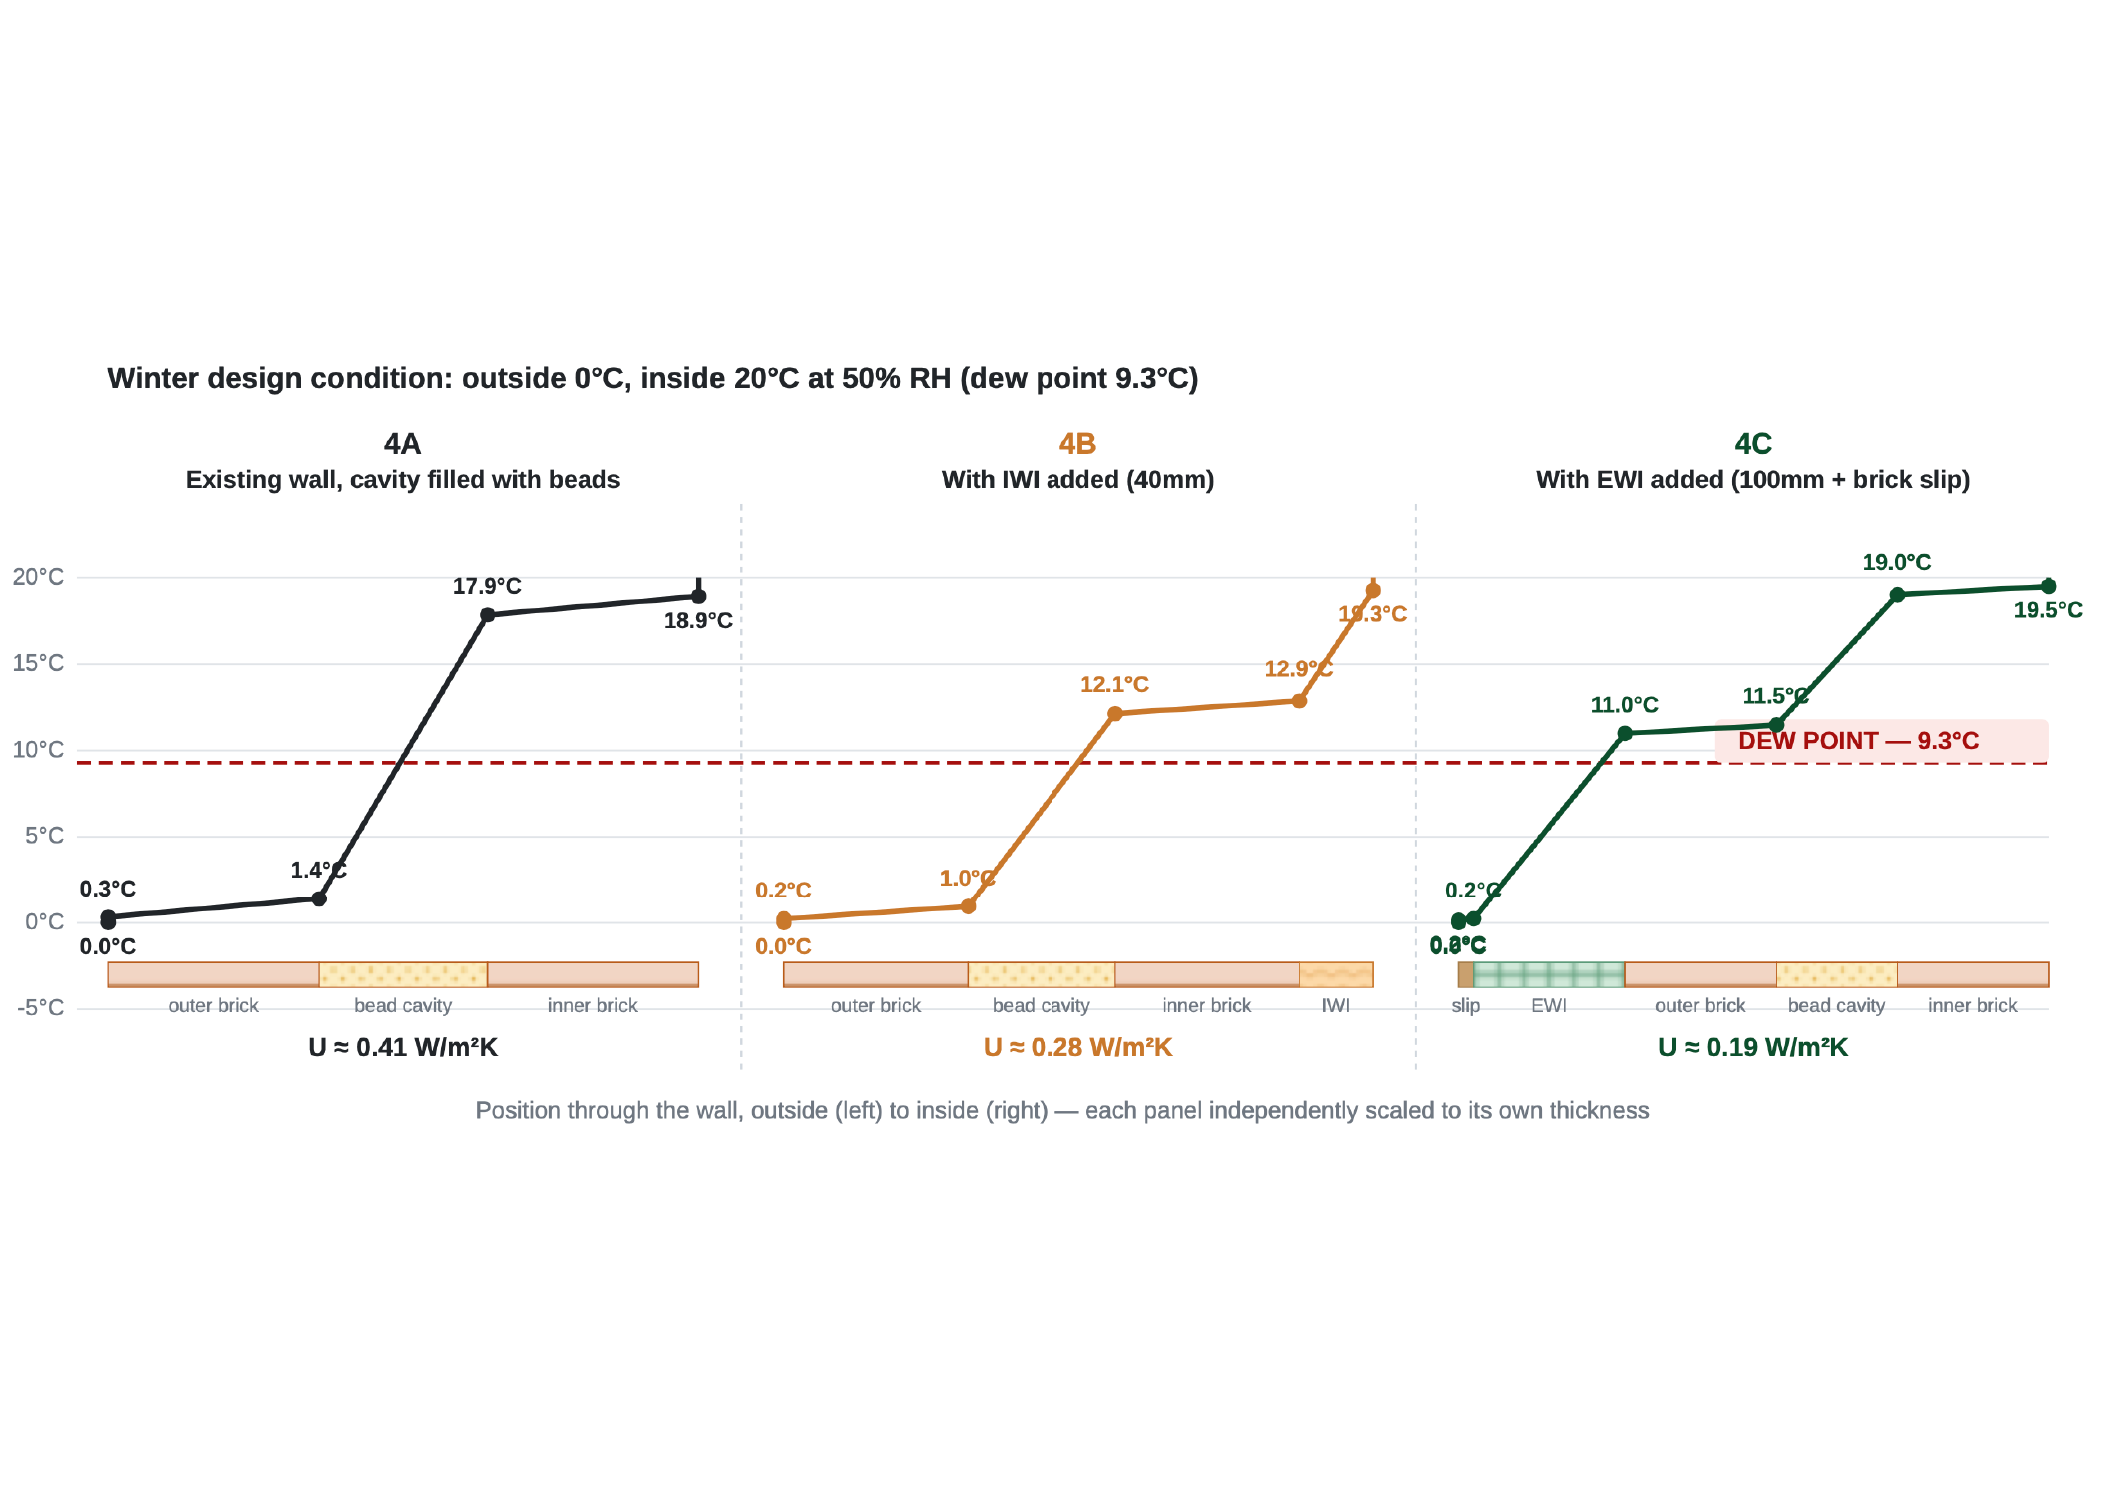
Bonded EPS bead cavity insulation, EWI to external walls wherever possible, and IWI where the party boundary prevents external insulation.
Decision summary
Should we retain the original IWI design or change to EWI?
Use EWI wherever possible, with IWI retained where the party boundary prevents external insulation.
A more continuous insulation layer, reduced thermal bridging, retained internal floor area, better use of the existing masonry within the insulated envelope and the opportunity to incorporate the existing elevations into one external system.
Higher cost, specialist installation, more complex external detailing, a change to the appearance of the house and the need for planning permission.
Planning permission granted. Detailed design and installation still to come. Performance not yet measured.
What we will measure
The reasoning above explains why we believe EWI is the better solution for our house, but the decision itself does not prove that we are right. Once the house is complete and occupied, we will return to these assumptions and compare them with what actually happens.
Energy demand
How much energy does the completed house require to maintain comfortable conditions throughout the year?
Indoor temperature
How stable are indoor temperatures through winter and summer, and how effectively does the house remain comfortable during periods of both cold and hot weather?
Humidity
How does internal humidity behave through the seasons after the fabric and ventilation systems have been upgraded?
Airtightness
How close does the completed building come to our airtightness target, and where are the remaining weaknesses?
Ultimately, the interesting question is not whether EWI appeared to be the better option on paper, but whether the additional cost and complexity translate into a more comfortable, lower-energy and better-performing home over time.
If our assumptions turn out to be wrong, we will say so. The purpose is not to justify decisions we have already made, but to document why we made them, measure the outcome and make what we learn useful to other people facing similar choices.